
Magnetic Stud Finder: How It Works, How to Use It, and Its Limits

How a magnetic stud finder works
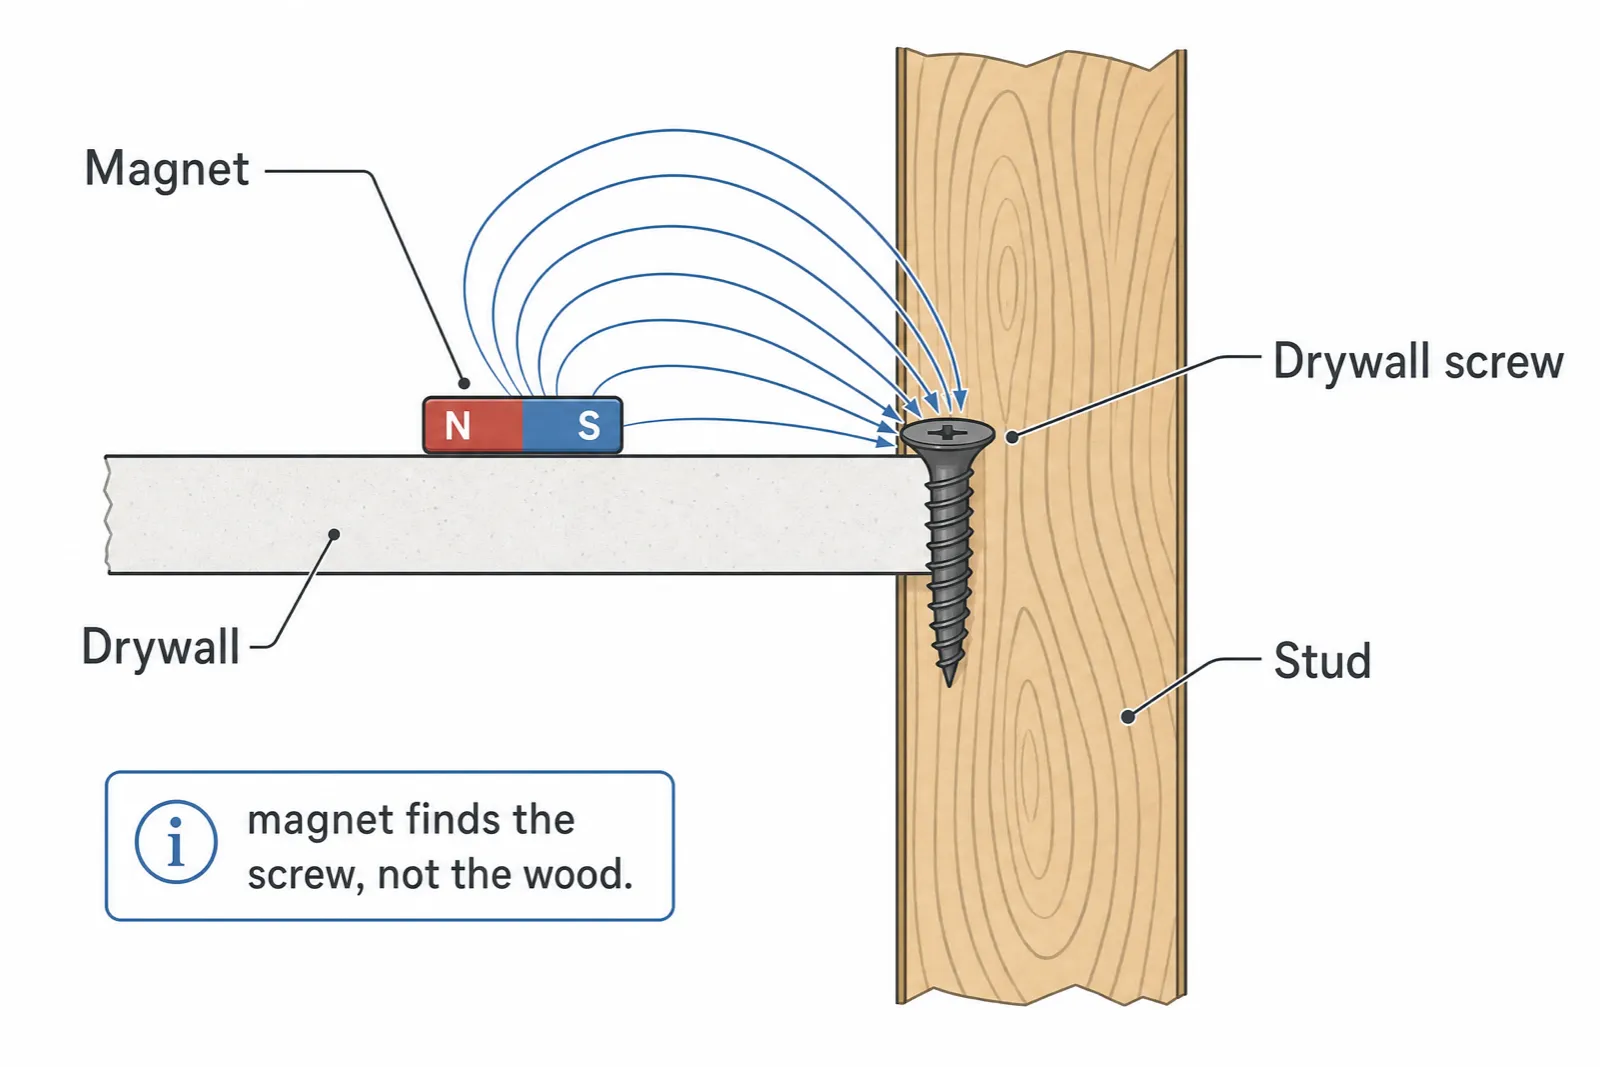
A magnetic stud finder doesn’t find studs. It finds the steel that holds the wall onto the studs, which is the same thing in practice. Drywall is fastened with steel screws or nails driven into every stud, spaced roughly every 12–16″ up the stud’s length. A strong neodymium magnet passing over one of those fasteners feels a distinct pull — through half an inch of drywall, through paint, through wallpaper, even through ceramic tile. The magnet has no idea there’s wood back there; it’s grabbing the screw head.
That’s the whole tool. Simple versions are a magnet in a plastic shell with a flat face. Better ones add a pivoting pointer or a small hanging magnet that swings toward the fastener as you approach it, so you can see the pull before you feel it. Some include a bubble level or a pencil notch for marking. None of them need a battery, and there’s nothing to calibrate — which is exactly why a lot of tradespeople keep one in a pocket next to a $40 electronic finder that’s still in the truck.
The same physics runs magnetometer stud finder apps: your phone’s compass sensor picks up the field distortion around the screw and shows it on screen instead of tugging your hand. Same target, different readout.
How to use a magnetic stud finder
The technique matters more than the brand, and the mistake nearly everyone makes is sweeping too fast.
- Start near where you want to mount. Hold the finder flat against the wall at roughly the height you’ll be drilling.
- Sweep slowly in an S pattern. Move horizontally about an inch per second. If nothing catches after 24″, drop down 4–6″ and sweep back. Fasteners are spaced vertically, so a horizontal pass at one height can pass between them; the S pattern covers the gaps.
- Mark the grab. When the magnet tugs or sticks, wiggle it to find the strongest point and pencil a mark. Some finders hang there on their own — that’s your mark.
- Confirm the vertical line. Move 12–16″ straight up or down and sweep horizontally again. A second grab on the same vertical line confirms a stud. One grab alone could be a nail plate, a metal box, or a stray screw.
- Find the neighbors. Studs are usually 16″ on center, sometimes 24″. Sweep at those distances to lock in the layout. Once you have three aligned studs, the rest of the wall is predictable.
- Center it if the load is heavy. The screw is on the stud, but not always dead center. For a TV or heavy shelf, probe with a small finish nail 3/4″ to each side of the mark to feel the stud’s edges.
Total time on a normal wall: two or three minutes for the first stud, seconds for each one after.
Magnetic vs. electronic vs. app
| Magnetic finder | Capacitive electronic finder | Magnetometer phone app | |
|---|---|---|---|
| Detects | Steel fasteners | Density change (the stud itself) | Steel fasteners |
| Batteries / calibration | None | Yes / yes, every wall | Uses the phone |
| Speed | Slow sweep until it grabs | Fast, single pass | Medium, live readout |
| Textured or uneven walls | Unaffected | Frequent false alarms | Unaffected |
| Tile, wallpaper, paint | Works | Struggles on tile | Works |
| Plaster and lath | Weak — fasteners are small and deep | Usually fails | Weak, same reason |
| Metal studs | Strong grab along the whole stud | Reads them, can’t tell metal from wood | Strong signal along the whole stud |
| Cost | About $15 | $20–60 | Free to try |
The magnet wins on reliability and cost. The electronic finder wins on speed and, on a smooth wall it likes, on marking edges. The app sits between them: magnet physics with a screen. If you already own a magnet, keep using it; if you own a phone, you can download the app and try the same method with a readout before you buy anything.
Where a magnetic stud finder fails
Honesty about the limits keeps you from drilling into the wrong thing.
- Thick plaster. Lath-and-plaster walls hold the lath with small nails buried under 3/4″ or more of plaster. A pocket magnet often feels nothing; a bigger magnet or a phone app may pick them up, but readings are weak and there are nails everywhere on the lath, not just at studs. See the plaster wall guide for the workarounds.
- Mud-set tile and thick assemblies. Anything that pushes the fasteners more than an inch from the surface drops the magnet’s pull below what you can feel.
- Glued drywall. Some installers glue sheets and screw only the edges. The field of the sheet has few fasteners, so sweep near the top and bottom of the wall where they’re guaranteed.
- False positives from other steel. Corner bead at outside corners, nail plates over pipes, metal electrical boxes, HVAC ducts. Real metal, not a stud. The vertical-line check in step 4 filters these out.
- Metal studs. Not a failure exactly — the magnet grabs hard along the entire stud — but you’ll get pull everywhere on the stud’s width, so the “screw = stud center” logic doesn’t apply. Use the metal stud guide for those walls.
When to use a magnet — and when to use something else
Use the magnetic finder for everyday drywall jobs: shelves, curtain rods, coat hooks, mirrors, a modest TV. It’s the tool least likely to lie to you on a real, painted, slightly uneven wall.
Reach for a capacitive or radar finder when you need the stud’s edges on a smooth wall fast, or when you’re scanning for pipes and cables rather than framing. Reach for the phone app when you want the magnet’s reliability with a live readout and don’t own a magnet — the app is free to try, ad-free, and reads the same screws. And on plaster, masonry, or anything that gives you nothing, stop scanning and switch to layout logic: outlets sit beside studs, studs land 16″ apart from a corner, and a single finish-nail probe settles any argument.
Whatever you use, confirm with two aligned hits before you drill. The magnet is cheap and honest; the two-minute check is what makes it accurate.
Frequently asked questions

Metal Stud Finder App: Find Steel Studs With Your Phone
Do stud finder apps work on metal studs? Better than on wood — steel studs are magnetic end to end. How to find them, and the mounting mistake to avoid.
How Does a Stud Finder Work? 4 Methods — and Which One Your Phone Uses
Magnetic, capacitive, radar and your phone's magnetometer each read a different signal behind the wall. Which one to trust on your wall — and a free test.
See behind the wall,
now in your pocket.
Stud Finder turns your phone into a precision wall scanner. Know where the studs, screws and pipes are before you drill.
Download the App